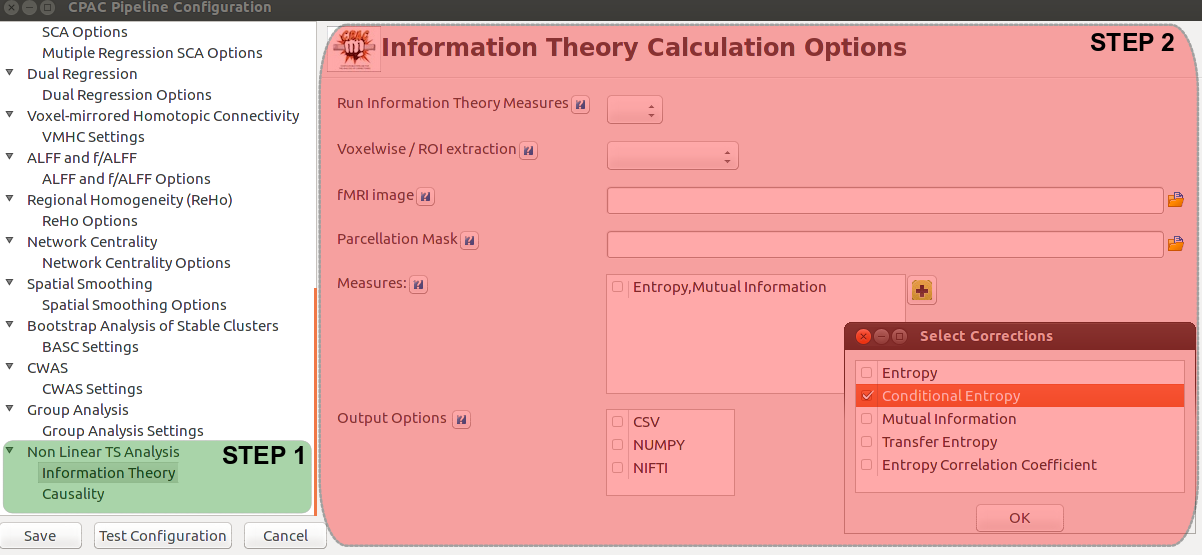
This week I have been trying to work with the migration of our modules to the GUI. For that, you will need to perform three main steps:
- Create the interface for your modules (2 steps)
- Define your space in the main configuration window tree. (Name your module/submodules)
- Define a window with configuration options (inputs and output of your workflow basically) for each one of your modules/submodules. The main window of the module usually is referred to an html file explaining what this module does and how does it work.
- Link the GUI with your workflows (1 step)
- Link the configuration window of each of the submodules with the corresponding workflow through the pipeline module, allowing the execution of your workflows.
Create the interface for your modules
STEP 1
The interface for the modules needs to be created. This is done by adding your module structure to the main configuration tree (a bit of planification is needed before deciding how the module structure is going to be organized). The first 2 steps should be done in parallel, I choosed to create the tree structure first, because I thought it was better a up to bottom approach.
First of all, you have to define your space in the config_window file, in the Class named ‘Mybook’.
There, you can find all the module names that will be listed in the main left of the pipeline configuration window. As an example, I have added some lines at the end of the Class:
1 2 3 4 5 6 7 8 9 | |
It is also important to add the name of your GUI Classes in the import at the beginning of the file. In the second step, these Classes will be defined.
STEP 2
In this step the Classes that create your configuration pages must be created. Here, it will be defined a window with configuration options (inputs and output of your workflow basically) for each one of your modules/submodules. For this purpose, it is neccessary to create a new file in the ‘pages’ directory, other files can be used an example.
The main window of the module (in our example the 48) is usually referred to an html file explaining what this module does and how does it work. If you don’t have such file yet, you can leave it blank. For the rest of submodules, as CPAC’s has its own framework built over wx, we can choose between many specific buttons and data tpyes to add to our window:
1 2 3 4 5 6 7 8 9 10 11 12 13 14 15 16 17 18 19 20 | |
This is an example of how it can be a GUI frame for our toolbox:
1 2 3 4 5 6 7 8 9 10 11 12 13 14 15 16 17 18 19 20 21 22 23 24 25 26 27 28 29 30 31 32 33 34 35 36 37 38 39 40 41 42 43 44 45 46 47 48 49 50 51 52 53 54 55 56 57 58 59 | |
It is important to update the init file of the folder ‘pages’ to make the new file available and checking all the intermodule dependencies and imports. After doing these modifications, the modifications will be seen as long as the MainUI file runs without problem.
In the next figure, it can be seen how the example code is translated into the GUI:

After completing your configuration, a YAML file will be created with the information provided into the different inputs.
Link the GUI with your workflows
STEP 3
This is probably the most important step along with having a good planification of the needs of the module. The objective here is to link the configuration window of each of the submodules with the corresponding workflow through the pipeline module and specifically the cpac_pipeline file, allowing the execution of your workflows.
First of all, it is needed to import the workflows into the file. After that, and having as a reference other workflow insertions, you can take the input data saved in the previous step from a Configuration object called ‘c’. This ‘c’ variable is an abstract representation used to store the options for the pipeline configuration YAML. The use of the YAML file, allows users to load preconfigured files easily. The YAML was generated by the GUI in the previous step and it is reloaded back in by cpac_runner as a Configuration object (‘c’). Finally, cpac_runner.py passes the Configuration object to cpac_pipeline.py as an argument.
There is the need of checking if the inputs are correct (otherwise, raise an error message), create the workflow and give to it the inputs extracted from ‘c’. cpac_pipeline.py is where the Nipype workflow object for each pipeline strategy is constructed via flow control. We will want to add a code block similar to this in order to add the nonlinear time-series node to these workflows. The functions will be encapsulated within nodes and connected to a workflow.
Short example of how to manage the inputs:
1 2 3 4 5 6 7 8 9 10 11 12 13 14 15 16 17 18 19 20 | |
After completing this last step, the new module of CPAC should be working.